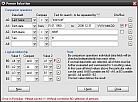
The initial creation of an "OFB" or an "Ancestry List" will be done by following steps - exemplary for OFB type 1:
- Start of program.
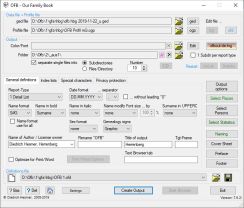
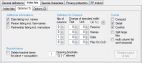
- Selection of data file, Gedcom profile file, Color/Font file (optional), output folder and general definitions.
[ Edit ] will call the Service Program "OFB-ColorFont.exe" for viewing, changing and creating color/font files. The listed file will be automatically loaded.
[ ofbout-xx.lng ] will allow to change to another output language.
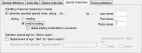
- Select Name of author from the list (must be entered previously by the license management of the OFB start center) or enter a name (limited output).
- Enter the Title of the output.
- Optional a renaming of the OFB title can be done. If empty "Our Family Book" will be used.
- Optional the name of a target frame of an own homepage can be entered to integrate the OFB files into the homepage. If empty the standard value will be used.
|
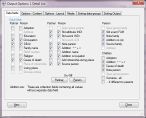
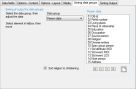
- Selection of "Index lists" to be created and, if necessary, selection of columns for the lists and other additional information to be added to the lists (if desired). 5 tabs are offering various options.
|
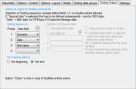
- Definition of "Special characters" for deletion in names, replacing "died"-sign by "died-inaction"-sign, etc. (if desired).
|
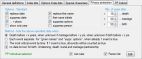
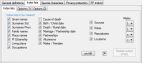
- Selection of the options for "Privacy protection" (if desired). 2 tabs are available. For more details see left menu "Privacy Protection".
In addition there is a tab "Statistics" to create about 25 different statistic reports.
|
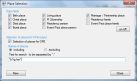
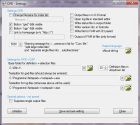
- [ Output Options ... ]
- Select options for Report selection (only for OFB type 4..8).
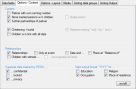
- Selection of "Data fields" to be included in the output.
- Selection of options "Content" to be included in the output.
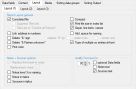
- Selection of options "Layout" for the output. 3 tabs are available.
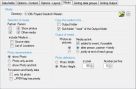
- Selection of the options for the "Media" and determination of the media folder (only required, if not already included in the Gedcom file among "OBJE -> FILE filename").
- Define the sequence of "Sorting data groups" of the output for 6 data groups incl. the data fields, the level-2 tags
and the tags of the standard groups.
- Define the sequence of "Sorting output" of persons resp. families within the output.
- [ Close ] will take all data and return to the main screen.
{ red }: Error at definition of "Sorting output" or a specified media
folder not found
{ orange }: Media are selected, but the folder name is missing (may be desired resp. not required)
|
- [ Select Location ] (if desired or the index list for Locations
is selected)
- Select the types of places to be used for the index list for
locations.
- Select the places to limit the locations for the OFB to a subset
of the database. For this, also the marked groups of locations, as above,
will be used. In addition mark "Selection of places for OFB" and
define the search criteria. This function is only available for OFB
Type 1..3.
- [ Close ] will take all data and return to the main screen
{ green }: a selection of locations to limit the data is defined
{ orange }: as index list "Loc names" is selected but the "Select Location
screen" not yet called. After calling and return to the main screen,
the color will change to "standard".
|
- [ Select Persons ] (if desired)
- Determination of the comparison operations (data elements +
type of comparison)
- Determination of the logical interrelationship between the
comparison operations
- [ Check ] will verify all entered data on their
correctness
- [ Close ] will take all data and return to the main screen
{ black }: no selection made
{ green }: error-free selection
{ red }: error in selection formulas
|
- [ Naming ] Administration of the names of 17 data groups, incl. the data fields, the tags of the standard groups, names of the months, prefix of the date data, the base tags, some general terms for the output and terms for relations, etc.
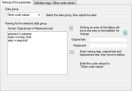
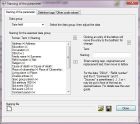
- Initialization - will load for all parameters their initial
value from the language file - or loading of a naming file (*ond).
- Selection of a data group displays the actual names for the
group. With each new selection the current data of the text boxes
will be assigned to the current group.
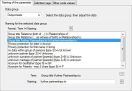
- Enter or change the names in the text boxes. Entered text -
semicolons are not allowed - will be put in front of the data value
in italics in the output. For the data elements "DB-Id" and "RefId
nbr" special features are available (see the User Guide).
- The data group "Relations" allows the modification of the terms
provided by the ged-file. The original text and the replacement text
must be entered.
- Storing of the naming file (*.ogp) for later re-use (if
desired)
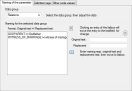
- [ Close ] will assign the current data of the text boxes to
the current group and the program returns to the main screen.
If data have been changed, a confirmation dialog for saving will pop up.
{ orange }: no filename specified or after changing the language as
reminder to load the correct naming file
{ red }: no filename available or file not found.
|
- [ Preface ] (if desired) A preface can be
integrated into the OFB and called from the index list.
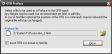
- Select a preface file of any file type. Recommended are
html- and pdf-files
- For html-files optional 3 lines containing the OFB css commands
may be inserted to the head of the file.
- [ Close ] will take all data and return to the main screen
{ black }: no preface entered or loaded
{ green }: a preface file defined and available
{ red }: filename existing but file not found
In addition there are 2 buttons to create a "Cover sheet" and to modify the "Footer" of the reports.
|
- [ Setting ] (if desired) Define the general settings of the OFB and the specific settings of the analysis.
The 2 "Button ..." options should be selected and the "Text editors" should be defined.
|
- Storing of the definition data for later re-use (if
desired). This includes the filename and path for the Gedcom
profile file, the naming file and the preface file, if created.
During loading of the definition file, these files also will be
loaded.
- [ Create Output ] starts processing the data file.
The button is only active, if for no button or field name the
text color is red and indicates an error.
- Reading the data file
- Output of a message window with information about the data
found and possible errors (the further output processing can be
canceled here)
- Selection of the Proband (starting person) (only for OFB Type
4..8)
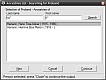
- Entry of search criteria for Last Name + First Name
- [ Search ] all relevant names + creation of the list of names
found
- Selection of the desired name or
new entry of search criteria
- [ Close ] the window and continue processing output with the
selected proband
- [ Cancel ] returns to main screen without any output
- Analysis of data + creation of the output files into the
selected output folder. Progress information will be written to
the status bar at the bottom of the main window.
|
- [ Start Browser ] starts the standard browser and opens the index list overview
- [ Exit ] to exit the program. If data have been changed, a confirmation dialog for saving will pop up.
Note: After changing the data of the naming file or the preface, don't forget to save the files in their screen each time. After changing the filename of the Gedcom profile, naming file or the preface, don't forget to save the definition file again. Only then the changes will be available for re-use.
|